I was very excited to get my hands on an NES again after so long. It was in great-looking shape, but when I popped in a game, I got a blinking red power light, and black screen. What would I need to do to get my games to play? Fortunately, I already knew about this common issue: the NES 72-pin connector.
Does the red power light blink when you turn your NES on? You have a bad connection between the 72-pin connector and the cartridge. If your cartridge contacts are very clean, the connector needs to be fixed or replaced. Repairing this problem is easy, but avoid poor connector replacements.
Table of Contents
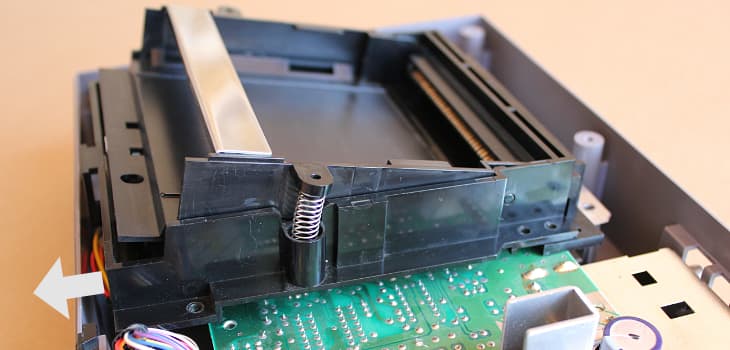
The iconic first generation NES, known as the front-loader, or the “toaster,” has a common point of failure that happens due to its unique design. Because the game cartridge slides into the front at a slight downward angle, and then gets pressed down to lay flat, the springy metal contact pins the cartridge slots into, get compressed while the game is in there.

For a game to play, the information in the chips that are on the circuit board inside the cartridge must get to the NES processor. The data moves through the connection between the pins in the “mouth” of the cartridge, and the 72-pin connector “slot” down inside the NES console. Both sides need to be functioning properly for games to work consistently.
Worth noting: The common practice of blowing into cartridges doesn’t work because it removes dust, but because moisture from your breath temporarily improves the connection. However, this actually makes things worse over time, as both cartridge and console connectors can build up oxidation from it, which then makes the connectors not work. Just don’t do it.
And finally - I personally went from my system not playing games at all, to mostly playing them, to now working 100% of the time. Follow these steps, and you can get the same results.
Tests to Confirm You Have a Connection Problem
First, make sure this isn’t just isolated to one or two cartridges. If others consistently come up every time, but a few don’t, you likely need to clean your cartridges that are having issues.
Try these 3 things, all designed to jigger the connection, in order to see if that’s your issue. Keep in mind that even if these don’t do anything, you may STILL have connection issue, but no worries - it’s cheap and easy to fix.
After each of these steps, turn the system on, and try the reset button a couple of times:
- Insert the cartridge as normal, but leave it in the up position.
- With the cartridge in the up position, back it out very slightly, so that you feel the connection between the cartridge pins and the slot pins disengage a little.
- Wiggle the cartridge a little left-to-right.
If any of this changes what’s happening - even if you get a garbled screen, or just a momentary flash of the game, you know you have a connection problem.
Thoroughly Clean the NES Cartridge Pins, Too
Because the connection needs both sides to be in optimal working order, you can’t neglect to THOROUGHLY clean the connector pins on the game cartridge. It takes two to tango, and your 72-pin connector can be freshly replaced, but less-than-clean cartridge pins can still keep things from working like they should.
Maybe you think I’m stating the obvious here. But I cleaned all of my carts carefully with cotton swabs soaked in 91% isopropyl alcohol until the swabs came away clean. The games STILL didn’t work 100% of the time. There is a more thorough way to clean that gets you solid, repeatably working games every time you load them up. Learn all about how to do a serious (not just alcohol) cleaning on your cartridges, to get them to work consistently.
Redo the 72-Pin Connector, if You Haven’t
As described above, the design of the original NES makes this issue likely, because when you have a game properly in position, it’s deforming the pins in the 72-pin connector by angling the cartridge. Over time, this makes the connector pins not contact the cartridge pins like they should. Because these systems are all 30 years old, it’s extremely likely that a new-to-you NES needs this refurbishing done, if it hasn’t been done already.

You have two main options for handling your NES 72-pin connector:
- Try rehabbing the connector you have
- Replace the connector (about $14)
I like to fix rather than replace IF I CAN. But for my NES, I ended up going the replacement route after the rehabs didn’t work so well for me. Your mileage may vary.
First, Try Rehabbing Your Existing 72-Pin Connector
There are two main options for trying to revive your existing 72-pin connector. Assuming that it isn’t rusted, terribly bent, or otherwise beyond hope, it may be worth trying one of these before you replace.
IMPORTANT: You try these at your own risk, but since a replacement is about $14, your risk is pretty low.
-
Boil Your NES 72-Pin Connector to Bring It Back to Life
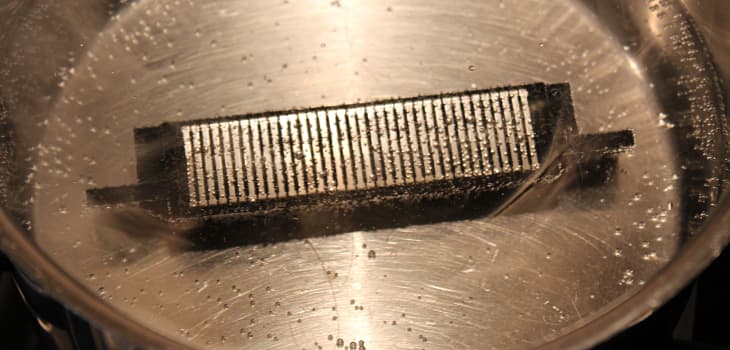
The most popular route for trying to revive your existing 72-pin connector is boiling. What? No, really. People swear by it. You remove the 72-pin connector from your system (see below), and boil it for a short while in a pot of water. Put your connector mouth-down (the part that received the cartridge) in a clean pot, and cover with enough water to put it maybe 1/2 inch below the surface. Bring the water to a boil, and boil for maybe 10-15 minutes. Let cool, dry thoroughly (dry it, then let it sit a few hours to let any interior moisture evaporate) before re-inserting it into your NES.

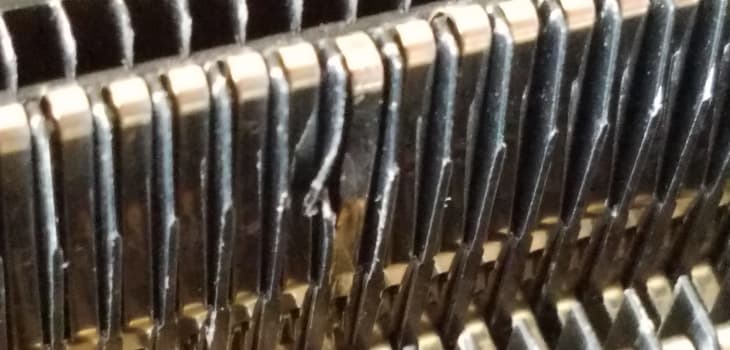
Full disclosure: Many people swear by this method. It didn’t work for me, and upon examining my connector afterward with a magnifier, I noticed that some of the thin plastic fins had been slightly damaged. Not enough to cause any functional problems, I don’t think, but just FYI. Also, if the other option is tossing and replacing, then it’s no big deal if your connector is no longer perfect -since it’s not otherwise working, anyway.

In this extreme close-up of the mouth of my 72-pin connector, you can see the damage that occurred during boiling. This should have no effect on functioning, but - just FYI. After reinserting the connector in your NES, see if it works. If it doesn’t work to your satisfaction, try one of the other options.
-
Carefully Bend Your 72-Pin Connector Pins
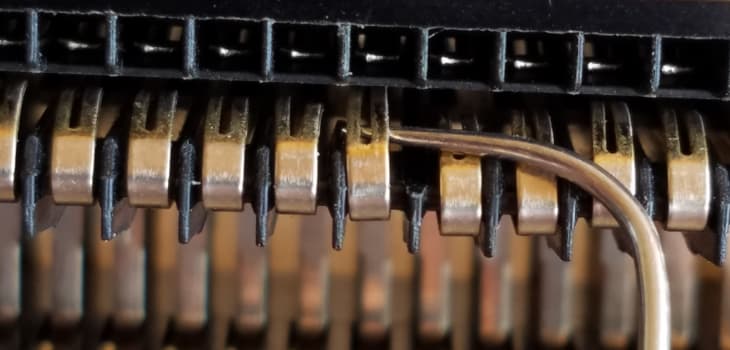
The other method for rehabbing a connector is to carefully bend the pins. Don’t mess with the side that connects to the NES motherboard, since those aren’t the problem. First, get some bright light, so you can see clearly. Take a small, pointy item you can bend slightly, such as a safety pin, and reach in, hooking the flat connector pin under either edge, lifting it with firm, but controlled pressure to pull it up just a little.
It’s important to keep your tool turned such that the pin is lifted up while staying level. You don’t want one edge of the connector pin higher than the other, or the pin getting bent sideways at all. It should remain flat/parallel to the connector, but lift up just a bit.

I’m using a dental pick from Walmart to bend the pins. The trick is to get the tip under both sides of the fork in the pin, but not under the next pin, and then pull up evenly while keeping the thing level so it doesn’t end up with one side higher than the other. I had trouble with this, and got some unevenness, and over-bending on some of my pins. Take this process very slowly, because it’s very easy to slip, and over-bend the pin. I managed to do that, and it took some fiddling to try and finesse it back. Again, if this fails, just buy a new connector (see below).
The Simplest 72-Pin Connector Fix: Replacement
There are three main options for replacing your NES 72-pin connector. If you Google it, you’re likely to see a TON of options, including a bunch on Amazon. Here’s the secret though: the overall experience in the community of people doing NES repairs is that these new, Chinese-made replacements are no good. They may not work, they may work inconsistently, or they may put the “death grip” (super-tight insertion/removal) on your game cartridges, which can cause damage. Best to avoid these.
The two remaining options:
- Get a refurbished original connector from a reliable dealer
- Get a Blinking Light Win kit
The $14 eBay Refurbished 72-Pin Connector
I asked around amongst people who do NES repair, and the option that I went with (and had fantastic success with) was getting an original Nintendo 72-pin connector that has been rehabbed by an experienced supplier. A fellow in an online discussion highly recommended this seller’s refurbished connectors. Mine arrived in just a few days, and was cheap. This is the route I went with my own system, and I was so happy with it, I recommend it to others.
The Blinking Light Win Kit ($30)
I hear great things about this kit. It’s more expensive, but that’s because it solves the problem at a fundamental level. Instead of just replacing your 72-pin connector, you replace the tray the cartridge goes into as well. The whole assembly was redesigned to have the connector slot be higher, so that you just insert the cartridge straight back, and there is no pushing down to set it in place. This relieves tension on the connector pins, and means you’re less likely to ever have to replace it again. An added benefit is that this kit also makes your system region-free, so that you can mix and match PAL (European) and NTSC (North American) cartridges and consoles. You can only buy these at the maker’s site: Arcade Works.
Removing and Reinserting the 72-Pin Connector
You’re going to go inside your NES and do a little surgery, but don’t worry, this doesn’t require serious geek skills. All you need is a Phillips head screwdriver, and a few minutes to walk through the steps.
Required items:
- Unplugged NES
- Medium-sized Phillips head screwdriver
Unplug your NES from all electrical and TV connections, as well as removing controllers and any inserted games.
-
Remove 6 Screws to Open the NES Housing
Flip your NES over, and insert your Phillips head screwdriver into one of the 6 screw holes shown in the photo below. IMPORTANT: Don’t use a screwdriver whose tip is too big or small, too pointed or flattish. Make sure the tip goes nicely into the screw head, and grips while turning. Keep good pressure on it, pushing the driver into the screw while you turn. If it slips, even when you are keeping a firm pressure on it, your tip may not be an ideal fit. Try a different one, so that you don’t strip the screw by grinding off the + sign on the screw head. Do this by hand, with a screwdriver. No screw guns or Phillips head drill bits, please.
Keep all of these screws in a group, for later re-insertion.
Once you have removed the screws, flip the unit over, place it on your work surface, and lift off the top of the housing.

Six screw positions marked with green indicators -
Remove the RF Shielding
Once you have the system open, you’ll see the interior is mostly covered by a piece of metal shielding. This is used to keep radio frequencies produced by the electronics from interfering with things like your TV.
Remove the 7 screws that go through the shielding, and collect them in a separate group from the first screws. You can see two screws that go through the front of the black plastic cartridge tray, but leave these until the next step.

Seven screw positions marked with green indicators -
Remove the Cartridge Tray
Now that you can see the entire black plastic cartridge tray mechanism, remove the 6 screws that anchor it down. Note that the 2 screws indicated with blue are extra long to pass through a thicker area. Make sure those go back into the proper spot.
Group the removed screws into a 3rd group for later reinsertion.
Now pull the whole tray mechanism (but not the 72-pin connector in back), toward the front of the console. Note that there is a small tab at the bottom of the front of the tray assembly that hooks underneath the front of the motherboard. You need to pull the tray forward and up to get the whole thing free. Once you pull it free, you can lift it up and out.

Four regular screw positions marked with green indicators, and the two long ones marked with blue indicators. 
Slide tray forward, then pull front forward and up to make tab underneath clear front edge of motherboard, and get tray out. -
Remove the 72-Pin Connector
Remove the last 2 screws, and lift the motherboard a little out of the underneath RF shielding, so the 72-pin connector is clear to slide off. Firmly push/pull the connector toward the back of the console, sliding it off of the connectors on the back of the motherboard. It can require some force, but always keep it under control - don’t bang or yank on anything. Just apply solid pressure with your thumbs to remove it.

Two screw positions marked with green indicators. Note that the right one is behind the upright bent metal piece. Note carefully how the 72-pin connector is oriented - which part goes onto the motherboard, and which part goes into the rear of the cartridge tray. This is important for when you reinsert it later.

Orientation of 72-pin connector in the NES. The top slot (viewed here from the end) is the one that the cartridge pins slide into (see red 72-pin connector in diagram at top of page). The bottom one that slides onto the motherboard connectors has a different profile. You’re halfway there! The rest is just reversing the steps with your rehabbed or replacement connector.
-
Attach the New, Refurbished, or Rehabbed 72-Pin Connector
Making sure to get your 72-pin connector oriented properly, carefully push/pull it onto the connectors on the back of the motherboard. Now seat the motherboard down into its place, and screw in the 2 screws that were removed.
-
Replace the Cartridge Tray
Bring the cartridge tray into position, keeping in mind that it must slide backward onto the front of the 72-pin connector. Don’t forget that the small tab on the bottom of the front of the tray assembly needs to hook underneath the front of the motherboard as you get it reinserted. If you miss this, it won’t lay in properly. Once in place, screw the 6 attachment screws back into place, making sure to put the longer ones into the indicated holes in the photo above for step 3.
-
Replace the RF Shielding
Now bring the metal RF shielding back into place, lining up the screw holes with those on the circuit board. Note that there are 4 small holes that plastic registration pins are meant to stick through to make sure the shield is seated properly. When it is fully aligned, including the registration pins, replace the second group of screws (7 of them).
-
Close the NES Housing
Place the top portion of the housing back into place, feeling around the seam to make sure it is perfectly aligned. Now holding the top and bottom together, flip the unit, and replace the first group of screws to secure it back in place (6 screws).
Voila! You are done. Try out your NES, and don’t forget to do the serious cleaning (not just alcohol) on your NES game cartridges to get optimal results every time you put in a game.